
How To Create Amazon Product Images To Maximise Your Sales
Table of Contents
1. Introduction: The Critical Role of Product Images in Amazon Success
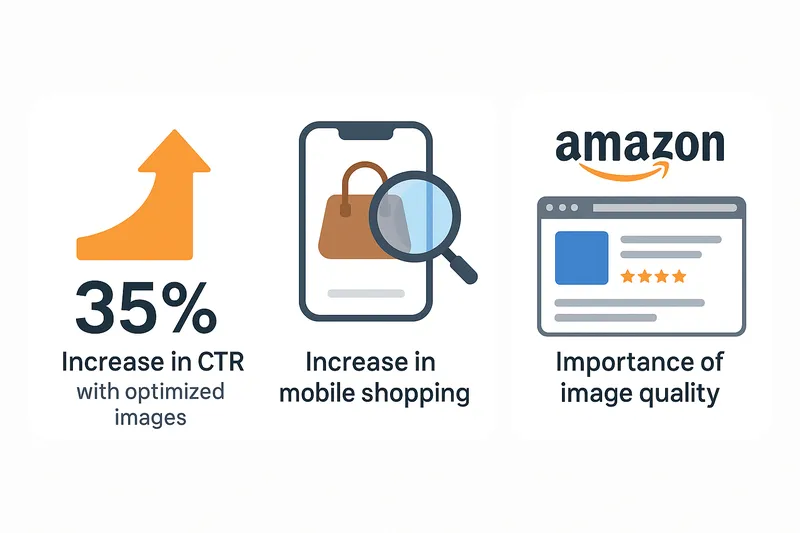
Did you know that high-quality product images can boost your click-through rates by up to 35%? In today’s competitive Amazon marketplace, your product images are often the first - and sometimes only - chance to grab a potential customer’s attention. Think of your main product image as your digital storefront window - it needs to be clear, professional, and compelling.
Recent studies show that better product images not only increase your sales but also reduce return rates. This happens because customers know exactly what they’re getting, leading to more satisfied buyers and fewer costly returns. With more people shopping on mobile devices than ever before in 2025, having crystal-clear, engaging product images isn’t just nice to have - it’s essential for success.
Amazon’s algorithm also favors listings with high-quality images. When your images meet Amazon’s standards and showcase your product effectively, you’re more likely to rank higher in search results. This means more visibility for your products and, ultimately, more sales.
2. Amazon’s Technical Image Requirements
Let’s start with the basics - Amazon’s technical requirements for product images. Getting these right is your first step toward success.
Main Image Specifications
| Requirement | Details |
|---|---|
| Minimum Size | 1000 x 1000 pixels |
| Recommended Size | 2000 x 2000 pixels |
| File Types | JPEG (best), PNG, TIFF, GIF (no animation) |
| Color Space | RGB only |
| Maximum File Size | 10MB |
| Minimum Resolution | 72 DPI |
Your main product image - the one that appears in search results - must follow strict rules:
- Pure white background (RGB: 255, 255, 255)
- Product must fill 85% of the frame
- No text, graphics, or watermarks allowed
- Show only what’s included in the purchase
- Product must be completely visible, not cut off
Secondary Images
For your additional images, you have more creative freedom. You can include:
- Lifestyle shots showing the product in use
- Infographics highlighting features
- Different angles and close-ups
- Size comparisons and scale references
Remember that even with this flexibility, Amazon prohibits:
- Offensive content
- Pricing information in images
- Unauthorized brand logos
- Safety claims without certification
3. Setting Up Your Photography Space
You don’t need an expensive studio to create professional product images. Here’s what you’ll need:
Essential Equipment
Basic Setup:
- Camera (a recent smartphone can work well)
- Tripod for stability
- White backdrop (a sweep of white paper works great)
- Good lighting (natural or artificial)
Professional Setup:
- DSLR or mirrorless camera
- Softbox lights (2-3 recommended)
- Light tent or photography box
- Professional backdrop system
Lighting Tips
Good lighting makes or breaks your product images. Natural light works well for beginners:
- Set up near a large window
- Use white foam board to reflect light
- Shoot during mid-day for consistent lighting
- Avoid direct sunlight that creates harsh shadows
For artificial lighting:
- Position lights at 45-degree angles
- Use diffusers to soften the light
- Ensure even lighting on all sides
- Test different heights to minimize shadows
4. Planning Your Product Shots
Before you start shooting, take time to plan. This preparation will save you hours of work later.
Research Your Competition
Study the top sellers in your category:
- What angles do they show?
- How do they demonstrate size and scale?
- What features do they highlight?
- Which lifestyle situations do they display?
Make a list of shots that work well, then plan how to make yours even better.
Understanding Customer Psychology
Think about what customers need to see before buying:
- Show scale to answer “How big is it?”
- Include close-ups to prove quality
- Demonstrate key features in action
- Address common concerns visually
Remember, customers can’t touch your product. Your images need to answer their questions before they ask them.
To be continued in the next sections…
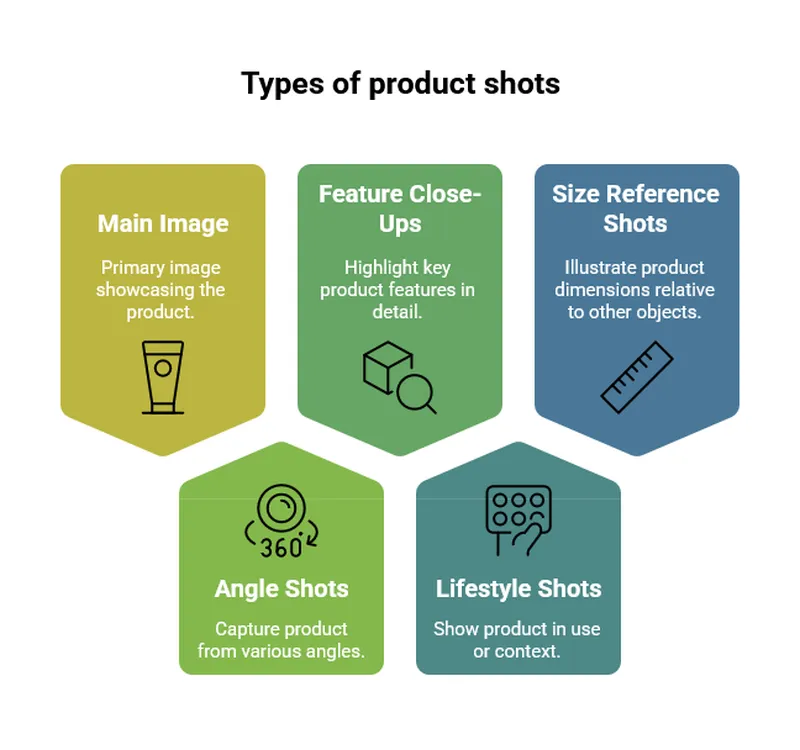
5. Essential Amazon Product Image Types
Your Amazon listing can include several types of images, each serving a specific purpose. Let’s explore how to make the most of each type.
Main Product Image
Your main image is crucial - it’s your first impression in search results. Here’s how to make it stand out:
- Position your product to show its most appealing angle
- Ensure perfect lighting with no shadows
- Center the product with proper spacing
- Make sure colors are accurate and vibrant
- Keep it simple and clean
Secondary Images That Sell
After your main image, include these essential shots:
Different Angles:
- Front view
- Back view
- Side views
- Top and bottom views
- Inside view (if relevant)
Detail Shots:
- Close-ups of important features
- Texture details
- Quality indicators
- Special functions or controls
- Material close-ups
Size Reference Images:
- Common objects for scale
- In-use scenarios showing size
- Measurement overlays
- Packaging size comparisons
Lifestyle Images
Lifestyle images help customers imagine owning your product:
- Show the product in real-life settings
- Include people using the product naturally
- Demonstrate different use cases
- Highlight the product’s benefits in action
Infographic Images
Use infographics to explain complex features:
- Label key product features
- Show size specifications
- Compare with previous models
- Highlight unique selling points
6. Taking Professional Product Photos
Let’s walk through the actual photography process step by step.
Before You Start
Prepare Your Product:
- Clean thoroughly - remove dust and fingerprints
- Check for damage or defects
- Remove protective films or stickers
- Position tags or labels neatly
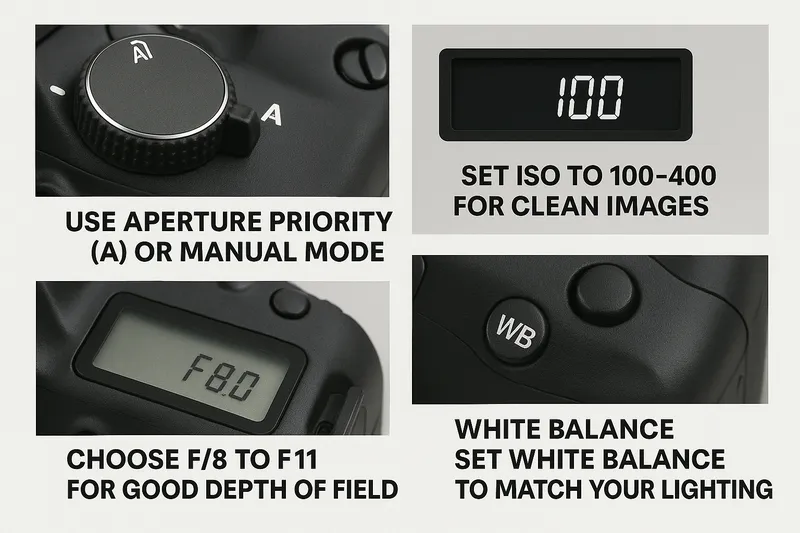
Camera Settings:
- Use Aperture Priority (A) or Manual mode
- Set ISO to 100-400 for clean images
- Choose f/8 to f/11 for good depth of field
- Set white balance to match your lighting
During the Shoot
Follow this workflow for consistent results:
- Take test shots to check lighting and exposure
- Shoot multiple angles systematically
- Review images frequently for quality
- Keep notes of successful setups
Common Problems to Watch For:
- Unwanted reflections
- Color cast from nearby objects
- Uneven lighting
- Soft focus or blur
- Dust or marks showing up
7. Image Editing and Optimization
Even great photos need some editing to meet Amazon’s standards.
Basic Editing Steps
- Color Correction:
- Adjust white balance
- Match product colors exactly
- Ensure consistent color across all images
- Background Cleanup:
- Remove any spots or shadows
- Make sure background is pure white
- Check edges for transparency issues
- Size and Format:
- Resize to at least 2000x2000 pixels
- Save as high-quality JPEG
- Keep file size under 10MB
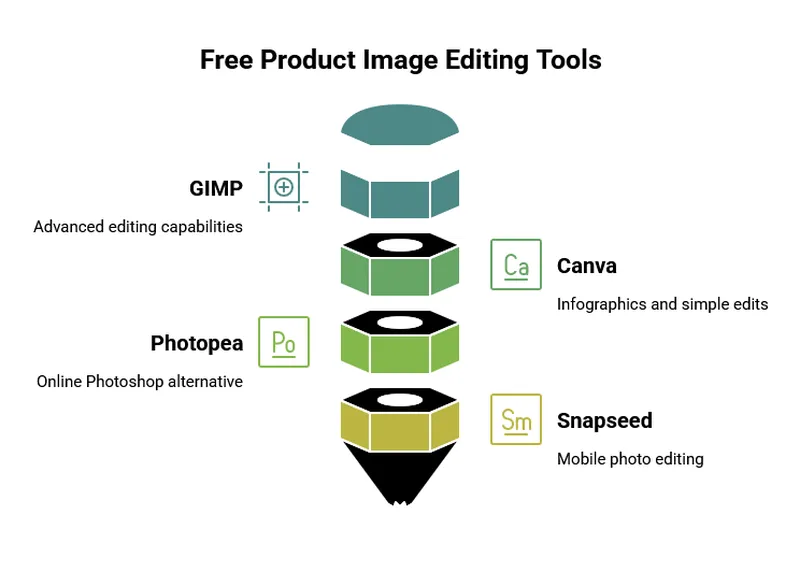
Free Editing Tools
You don’t need expensive software to create great product images:
- GIMP for advanced editing
- Canva for simple edits and infographics
- Photopea for online editing
- Snapseed for mobile editing
Professional Editing Tips
- Use layers to make non-destructive edits
- Save your editing steps for consistency
- Create templates for batch processing
- Keep original files as backups
8. Advanced Optimization Strategies
Take your images to the next level with these advanced techniques.
A/B Testing
Test different image variations to find what works best:
- Main image angles
- Background shades of white
- Product arrangement
- Lifestyle scene setups
Track these metrics:
- Click-through rate
- Conversion rate
- Time spent on listing
- Add to cart rate
Mobile Optimization
With most shoppers using phones, optimize for mobile:
- Test images on multiple devices
- Ensure text is readable on small screens
- Keep important details visible when scaled down
- Check loading speed on mobile networks
Category-Specific Tips
Clothing and Accessories:
- Include on-model photos
- Show size and fit details
- Display color variations
- Include close-ups of materials
Electronics:
- Show all included items
- Demonstrate size scale
- Include interface close-ups
- Show connectivity options
Home Goods:
- Display in room settings
- Show scale with furniture
- Include measurement diagrams
- Demonstrate assembly if required
9. Enhanced Content Options
Stay ahead of competition with these advanced image features.
360-Degree Images
360-degree views give customers complete product understanding:
- Use a turntable for consistent rotation
- Take 24-36 images for smooth rotation
- Maintain consistent lighting throughout
- Keep camera position fixed
Product Videos
Short videos can boost conversion rates:
- 15-30 seconds is ideal
- Show product in use
- Highlight key features
- Include unboxing if relevant
10. Measuring Success
Track these metrics to gauge image performance:
| Metric | Target | How to Measure |
|---|---|---|
| Click-through Rate | >35% increase | Amazon Analytics |
| Conversion Rate | >10% increase | Sales Dashboard |
| Return Rate | <2% decrease | Returns Report |
| Image Quality Score | 90+ | Amazon Style Check |
Regular Review Process
Schedule these image checks:
- Monthly competitor analysis
- Quarterly image updates
- Seasonal photo refreshes
- Annual complete review
11. Implementation Guide
Follow this checklist to improve your images:
- Immediate Actions:
- Update main product image
- Add missing angle shots
- Create size reference images
- Add lifestyle photos
- Week 1-2:
- Optimize all technical aspects
- Create infographics
- Add enhanced content
- Test on mobile devices
- Week 3-4:
- Begin A/B testing
- Monitor metrics
- Adjust based on data
- Plan next improvements
12. Conclusion
Great product images are your best sales tool on Amazon. They build trust, reduce returns, and boost conversions. Remember these key points:
- Follow Amazon’s technical requirements exactly
- Show your product clearly and accurately
- Use all available image slots
- Test and optimize regularly
By implementing these strategies, you’ll create product images that not only meet Amazon’s standards but also maximize your sales potential.